Wednesday, June 29, 2011

My creative space

It's been a full on week, I'm not too sure why. I feel like I've literally been running after time.
I've got a cold, the kids had it too (and it looks like they've both got chickenpox), it's been cold, wet...
So I've still got a lot of projects on the go and not many photos so far.
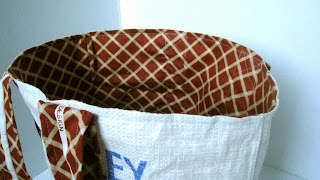
I did manage to make a market bag out of a big plastic woven grain bag. We order our organic flour (among many other organic products) in bulk. It's great, cheaper, less packaging and most of the packaging we get gets re-used some way or another. I've been wanting to make some shopping bags out of these plastic flour/ grain bags for a while, so with an hour to spare the other night I decided to give it a go. Needs improvement, but it works.


There's a few more bags lying around, so I'll be making more. Eventually. They make great market bags though, and I like the looks of them. I used this one today at the supermarket and felt quite smart!


More creative spaces here!

Prosper... c'est le roi du pain d'epices!

Translated: "Prosper... it's the king of the spices bread!". Ok, that doesn't sound nearly as interesting in english, and most of you must be wondering what the hell I'm going on about. "Pain d'epices" is the french equivalent to the english ginger bread, but with other spices thrown in the mix. I loved it as a kid. The popular store bought version had a big brown bear called Prosper and a song every french kid will remember...


Anyway, I've been using the following recipe for a while and every time it brings back those fond childhood memories... like the famous madeleine of Proust. It's super simple and can be whipped up in 20mn, no kidding.

Pain d'epices:
- 250g manuka honey or other strong flavoured honey
- 10cl milk
- 100g butter, melted
- 200g flour
- 1/2 pack baking powder (about 3 tsp I think, or 7g)
- 50g sugar (you can omit this if you don't want it too sweet)
- 1 egg
- pinch of salt
- 1tsp cinnamon
- 1 tsp ginger
- 1/2 tsp ground cloves
- 1/2 tsp cardamon
- 1/4 tsp nutmeg

Preaheat oven to 180ºC.
Warm the milk in a pot on low heat, then add honey and butter. Once it's all melted, leave aside to cool. Meanwhile mix flour, baking powder, salt and spices. Add the liquid mix and the egg. Mix until the batter is smooth.
Pour the batter in a greased loaf tin. Cook at 180ºC for about 30-35mn, or until a knife inserted in the middle comes out clean.

Slice and eat warm, on its own or with butter, jam, chutney,...

Saturday, June 25, 2011

Hair donation

Some of you might have noticed I have changed... yes, I finally cut my hair after over two years, I was really dying for a change. My relationship with hairdressers has never been that great, how many times have I walked out wanting to cry because I hated my hair style but just couldn't bring myself to complain.
I was reading in a magazine recently that our hair in an expression of our deeper self and personality, which is why so many women find it essential to 1- have a hairstyle they are happy with 2- get on well with their hairdresser. It a touchy subject... It took me years to "find myself" hair wise, and have the courage to front up with a hairdresser if I felt my cut wasn't what I expected.
One of the reasons I waited so long to get my hair cut this time round is that I didn't know if I could trust any hairdresser in Gisborne. Then I met a friend who had just had a cut, and she looked good (and happy about it), so I just had to ask her who she went to see. And then I went, and I didn't feel like crying when I walked out.


My hair was so long (16" long at its longest), I thought I ought to find a good use for it, so I looked online for a place that could use it to make wigs for cancer patients. There is no such place in New Zealand (at least not by Google standards), but there is a place called Freedom Wigs that makes wigs out of real hair for women with alopecia or other medical conditions that cause hair loss. So that's where I sent my ponytail. And hopefully it will be of use!

The hairdresser was very nervous when I asked him to cut it all in one go!

Wednesday, June 22, 2011

My creative space: refashion

A few months back one of the blogs I like to follow, Grosgrain, dedicated a whole month to refashioning knits. It's called "Embellish knit month" and it's well worth checking out. Anyway, it was really inspiring and it's made me want to do some embellishments of my own, only I could never wear some of the knits showcased. Don't get me wrong, they're all beautiful, but it's not really my style, I live in a small New Zealand town where most people turn up at the dairy wearing PJ's (at any time of the day) and I have two kids that play and eat like, well kids.
None of the knits I've had so far suited this kind of re-style, until I found this simple white Max top at the op shop last week. So I decided to give it a go. I was going for some embellishment that wouldn't be too "in your face", so I decided to stick to the white look.

First I sewed some mini doilies found at the op shop the same day. They were the perfect colour, almost the same white as the cardigan.

Then I used some white nylon tights (also from the op shop) to make flowers using this tutorial. I was originally wanting to wear those tights but when I tried them on at home I realized they had a hole in them. Must have been fate!

Anyway, instead of gluing the flowers I sewed them on, only to realize once I tried the cardigan on that one of them flowers was in the wrong place. It looked like I had a flower growing under my armpit. oups. Note to self: try garment on before sewing. So I undid and did again.
eerr, I've got a flower growing in my armpit, help!

And so there, a nice woolen cardi customized by me and that I'm happy to wear, that looks nice but not too over the top to wear with my PJs when I go to the mall. Yay!

Tadaaa!


I'd be quite keen to try another refashion similar to this one next time...

More creative goodness here.

Of patches and friendship

I've been patching things up lately. There was a little invasion of the clothes moth kind, touch wood not in my workshop, in my wardrobe. I had to let go of a few clothes, but some of the were just too good to throw away (or rather to add to the pile of upcycles in the workshop). What's a few little holes? Well, the mail problem is that they can get bigger, so I decided to use patches. Not store bought ones though. I mean, I do have a sewing machine and a pair of scissors or two, so why not make some of my own? I found that woolen blankets were perfect for this kind of venture, they won't shrink in the washing and they add some cool colors to clothes. And I have lots of scraps after making all these patchwork woolen curtains. So I've been cutting out hearts and stars, just because I like them and they're relatively easy to cut out.

Today I caught up with a friend I hadn't seen in a while. That felt like patching things up too, you know, the catching up with their lives and them with yours, talking about what they're up to, what other people we know are up to, future plans... It's hard for me living so far away from so many people I'd like to be closer too, and whenever I reconnect with some, I feel nostalgic in some ways, and sad I can't have my loved souls around... more... Luckily we live in the age of technology, and Skype has helped ease my loneliness, as well as having met great people here too.
It was very nice seeing an old friend in person though, and we had a short but nice time, and I look forward to our paths crossing again, hopefully sooner than later.

Tuesday, June 21, 2011

Done

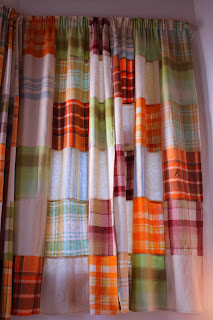
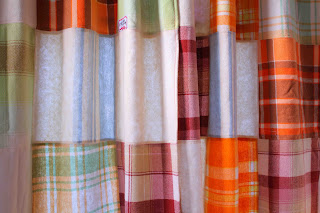
At last! I've finally finished the last set of patchwork woolen curtains, they're hanging above the window and we now have a very cool looking patchwork of woolen blankets that takes up a whole wall. Phew.


I wasn't too sure about the color combination on this one, I just used whatever I had lying around and though it would look uglier than the other two sets, but it turned out alright and after a few days staring at it, I've come to think it's actually my favorite one. It's also the tidiest one, probably because I pinned the squares before sewing them AND used a sewing guide, very handy tool that came with my machine. Goes to show I really ought to go the extra length and actually put more time into getting things ready for sewing beforehand!

Monday, June 20, 2011

Tagliatelle with sausages and porcini mushrooms

I recently started making my own pasta. When my mum came over she brought a pasta machine with her (oh and some cheeeeese), and I vowed I wouldn't buy the dried pasta from the store anymore. The main reason is to avoid all that packaging (plastic AND cardboard, woooot!), but the fact is, fresh pasta is so much nicer than dried pasta, it hasn't been that hard to stick to my vow. Ok, it does take a bit longer because you have to make the pasta dough, then roll it through the machine, but it only takes 3-4 minutes to cook. I'm getting better and faster at it, and within half an hour I can have enough pasta for 4 very hungry people ready to eat. I usually make enough dough for 2 meals, use the first half of it fresh then freeze the other half. All it has meant is that we eat less pasta (which is not a bad thing in itself).
A few nights ago I innovated and used sausages and dried porcini mushrooms for the sauce. It was beautiful, if dare say myself. But let me share this divine and easy recipe with you.


What you'll need:

- For the pasta (for 4 hungry people):
3 cups of flour (I like to mix half white and half wholemeal flour) - 4 eggs

Put flour in a bowl, make a well in the center and break your eggs in it. Stir with a fork until it forms a dough, then keep kneading with your hands until the dough can be shaped into a ball. It should be firm, but not crumbly or sticky. If it is too dry and crumbles, add water, tiny bits at a time, until the dough comes together. If it is too sticky, add a bit of flour until you get the right consistency. Once ready, you can refrigerate the dough until you want to make your pasta.
Roll the dough into a big sausage, cut in even slices. Take the first slice, flatten it a bit and roll into the rollers of your pasta machine, set on the biggest setting (mine is 7). Fold in three, roll again lengthwise and repeat once more. Then go down two settings, roll again, then down two more, roll, until you get to the desired thickness. For tagliatelle, I stop at 2, for spaghetti 3. You should now have one long thin strip of pasta dough (and you can stop here if you want to make lasagna or ravioli!). Flour both sides, then roll into the pasta cutter of your choice (we prefer tagliatelle). Put it aside and repeat with another slice.


- For the sauce:
about 6 good quality sausages (our local deli makes lamb/rosemary/garlic ones that are very nice and tasty) - a handful dried porcini mushrooms - one bay leaf - knob of butter - pinch of flour - your choice of greens (I used silverbeet, and some fresh nasturtiums sprinkled on top)

Soak mushrooms in about a cup to a cup and a half boiling water.
Cook the sausages in a heavy base pan. Once cooked, take them out, leaving the fat in the pan, and chop into bite size pieces. Drain the mushrooms, reserving the water.
With the pan still on the element (but not too hot) add the knob of butter to the pan, then once it's melted add the flour. When the flour/butter mix starts getting dough-y, add the porcini water, greens and bay leaf and mix until the sauce thickens a bit. Syrup kind of consistency. Add the mushrooms and sausages, mix with your pasta, and serve hot.

Saturday, June 18, 2011

Changes

I'm moving things around the house, trying to keep a minimum of tidiness... this old hammock appeared from nowhere and was squatting the floor, I decided to put it to good use (until summer anyway).

Yes this hammock is FULL of soft toys...


Josh moved his office to his mess room, so I decided to move my little stereo into that spot. I can finally listen to national radio!

And some pics of the boys...


Wednesday, June 15, 2011

My creative space

I finally started on the last set of patchwork woolen curtains...


I also made a skirt, hoping to enter it into the Skirt Week 2011 challenge, you can check out the flickr pool here. I've been entering all sorts of challenges and sew alongs this year, it's fun and challenging. So far none of my little projects got any mention or notice, but hey, I still get to wear the stuff at the end of the day! My wardrobe is slowly filling up with my own creations, which I quite like, and I'm hoping to use a few of the patterns I come up with to make clothing for my Etsy shop. Wish me luck!


As for the skirt itself, I'm pretty happy with it, although I can't say blue rocks my world. It's made from a wool/ cashmere blend I found at Global fabrics in Wellington last year, and it being a fabric scrap, there was just enough to make this skirt. The fabric is super soft and I figured it'd be prefect for winter... Blue is slowly overtaking my wardrobe, maybe it is the new me??? I used the same concept I developed with the pants I made, that is an adjustable waist, held on by a (beautiful? funky?) tie. I'm really into complementary colors at the moment, and the dash of orange lifts the dress up a bit. I used another piece of scrap fabric and some vintage lace to make the pockets, added some orange hearts (cut out from the scrap wool used to make the above mentioned curtains), just to give the skirt a bit more funk and personality. Finally, I used a piece of japanese looking scrap fabric from a pillow case (I'd already used it to make something else) for the inside casing and the side where the tie is tied.


 More creative spaces here.

Tuesday, June 14, 2011

My workshop

Yes, I am lucky enough to have a room to myself. It's slowly getting organized and on a good day, it's tidy enough to walk around without tripping on fabrics. It makes creating and crafting a breeze. And it's MY space, no toys or clothes lying around, my mess, no kids playing with scissors and pins.


Monday, June 13, 2011

Oat crackers: a recipe

Have you ever tried Nairn's oat crackers? Yummy, right?
I have been wanting to replicate these cracker for a while. Lately we've been having porridge for breakfast, and we usually soak the oats the day before. Every now and then we eat something different, so I'm left with a jar of soaked jumbo oats (they're usually fine for about 2-3 days, depending on ambient temperature). The other day I decided to use them to make crackers. I added a bit of wholemeal flour, lots of butter and mixed it into a dough. I flattened walnut size balls onto a baking tray then baked them at 150ºC until slightly golden. Once cooled, they taste like Nairn's crackers. Or like my memory of it anyway.  They're nice, they don't last in our house they're so nice. And very easy to make. Perfect for nibbles with pesto, or chutney (I made a persimmon chutney that goes perfectly well with cheddar cheese, on a piece of oat cracker of course!), or cheese, or all of the previous combined.

Here's a list of the ingredients:
- 1 1/2 cup jumbo oats, soaked 24h
- 2 cups wholemeal flour
- 120g butter

Mix until it forms a dough, take walnut size pieces and flatten onto a baking tray, bake at 150ºC until slightly golden, flip onto other side and bake a little more. Let cool.

Sunday, June 12, 2011

I wish I could draw

As well as Ben Heine. Well actually he seems to be an all round super talented man this one... he can draw, takes pretty good photographs, has genius ideas and speaks quite a few languages... check out his profile and more of his work here.


Thursday, June 9, 2011

It's all about me

I've been making a few things for myself lately, so I feel a bit spoilt and I'm happy to be changing my wardrobe (and we had a clothes swap last week end!). I made my first pair of pants, using one of my old pairs as a guide. A few details here and there need to be altered (next pair) but hey, they fit!


I also refashioned a black tunic I got given, by adding some funky orange 70s fabric. This one is going to my shop though, since I can't breastfeed with this kind of top, and I might be breastfeeding for a while if Tahi's anything to go by (he self weaned just short of 3 years old).
Tunic refashion: before

Tunic refashion: After
I've also been upcycling some tee shirts and woolen tops, respectively into a hoodie (for a friend) and a winter dress (in my shop).